


18 Shed Building Tips I Learned the Hard Way
So you're building a shed.
Good. You're about to do one of the most satisfying things a homeowner can do. Seriously. There's nothing like standing in your backyard looking at something YOU built with your own two hands.
But I'm not gonna sugarcoat it. There are a bunch of mistakes that can turn a fun weekend project into a month-long headache. I've made most of them myself.
I've been building sheds for over 30 years. And these 18 tips are the ones I wish someone had taped to my toolbox before my first build.
Read through them before you cut a single board. Your future self will thank you.
Let's get into it.
1. Your Foundation Doesn't Need to Be Fancy
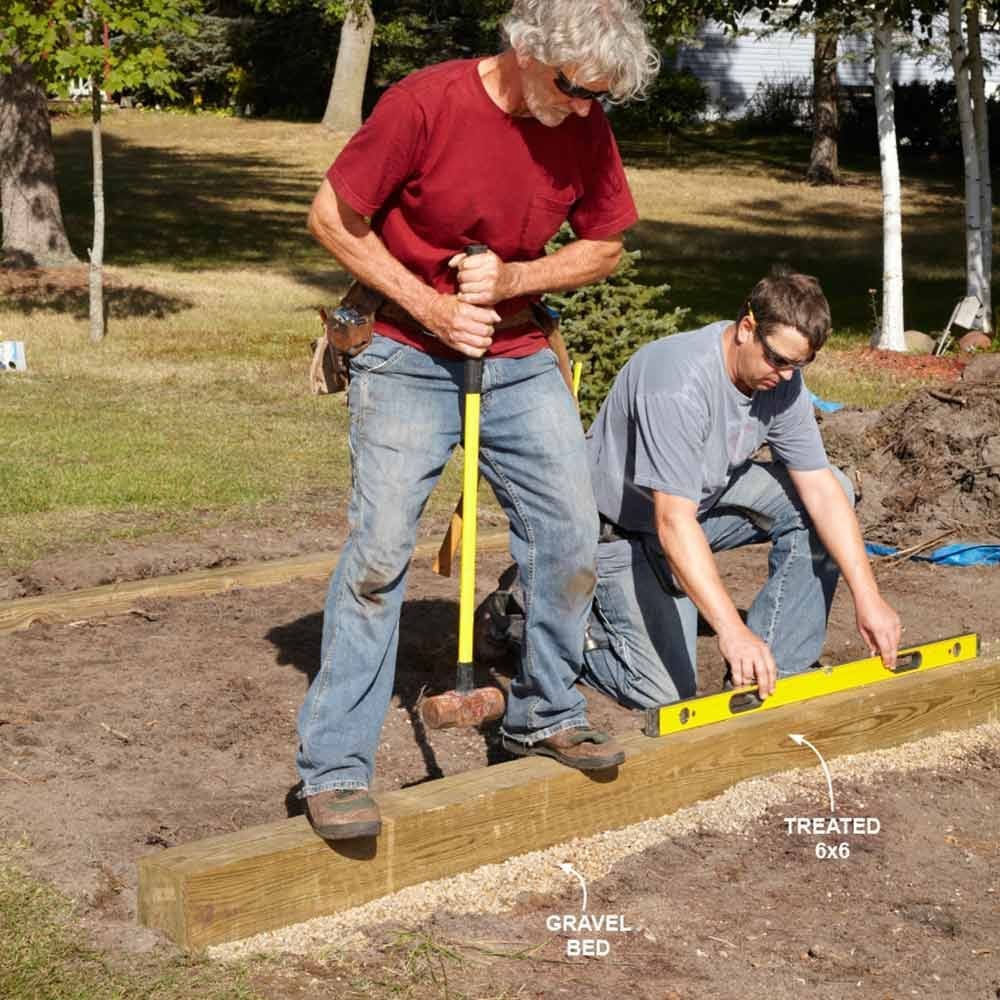
Most guys overthink this part.
For a basic shed on flat ground with decent drainage, you don't need deep footings. Two trenches, some gravel, and a pair of treated 6x6s. That's it.
Level them, square them up, and you're ready to frame.
I've set up foundations like this that have been sitting solid for 15+ years. No cracks, no shifting. The key is making sure your soil drains. If you get puddles in your yard after a rain, you'll want to do a bit more work.
But for most backyards? Gravel and 6x6s.
Done.
2. Sloped Yard? Build It Like a Deck
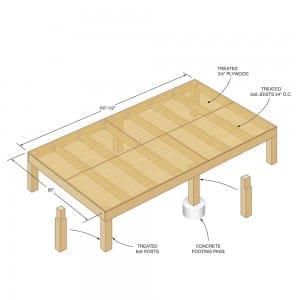
If your site slopes, forget concrete. Pouring concrete on a slope means building tall forms and using way more material than you need.
Instead, build your shed floor like a deck. Footings, posts, a wood frame, and plywood on top.
I did this on my buddy Ray's property a few years back. His yard dropped about 18 inches over 12 feet. We had the floor framed and level in half a day. Would've taken us a full weekend just to build concrete forms.
And yeah, there's a gap underneath. If it bugs you, just build a simple skirt to cover it. Looks clean, keeps critters out.
Oh, and one more thing. Before you dig ANYTHING, go to call811.com or call 811. They'll mark your buried utilities for free. I know a guy who hit a gas line digging post holes. Trust me, it's not worth skipping.
Downloads

Right click and select "save link" or "save target as" to save the PDF on your computer
3. Want a Bombproof Floor? Pour a Slab
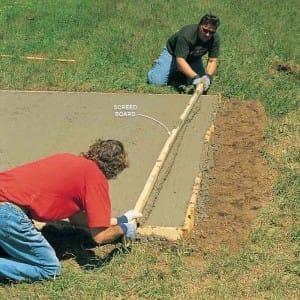
If you want a floor that'll outlast the shed itself, concrete is the way to go.
It's strong, it's flat, and if you're gonna use the shed as a workshop with heavy tools, nothing beats it. Plus, if you pour it yourself, the cost is about the same as building a wood platform.
The trick is getting the forms right. Which brings me to the next tip...
You might also be interested
Wait... Your Shed Has Its Own Power?

My neighbor Dave couldn't believe I wired my shed for lights, a fan, and tool chargers without calling an electrician.
Took me one afternoon. Cost me less than $50.
4. Square It Up. I Mean REALLY Square It Up
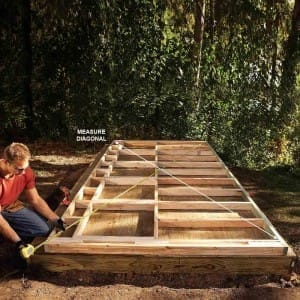
This is the tip that would've saved me about 40 hours on my first three builds.
When you're setting up your floor, whether it's a slab or a wood platform, measure diagonally from corner to corner. Both directions. Adjust until those measurements are exactly the same.
I mean EXACTLY.
If your floor is off by even half an inch, that error follows you everywhere. Your door won't close right. Your roof shingles won't line up. Your trim will have gaps.
And you'll be standing there at the end of the project thinking "what happened?"
I'll tell you what happened. The floor was out of square.
Do the same thing with your walls before you stand them up. Measure diagonally, adjust, THEN nail the siding. Five extra minutes here saves five extra hours later.
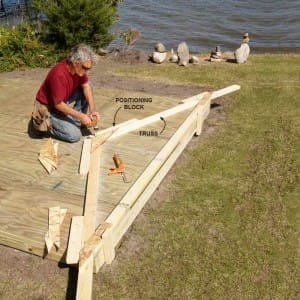
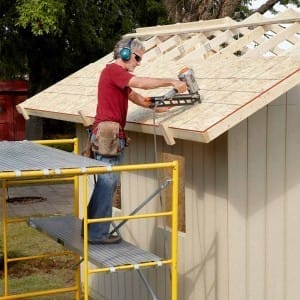
5. Build Your Roof With Trusses (Not One Rafter at a Time)
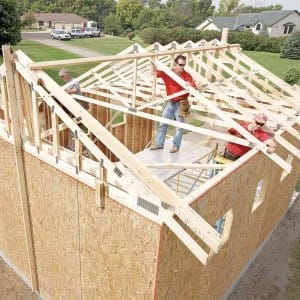
I used to frame roofs one rafter at a time. Measuring each one, cutting each one, holding it up there while trying not to fall off the ladder.
Then I started using trusses.
Night and day.
You need one truss about every 2 feet. You can order them from the lumberyard, or build them yourself for about half the price. If you build your own, use plywood gussets glued and screwed to the joints. They'll be plenty strong.
The best part? You can assemble trusses right on the shed floor before the walls go up. Snap some chalk lines on the floor as a template, cut your parts, and knock them out one after another. Way faster than doing it up on the roof.
You might also be interested
Never Buy Batteries Again

Dead Simple Trick Brings Any Battery Back To Life
6. Put the Siding On BEFORE You Raise the Walls
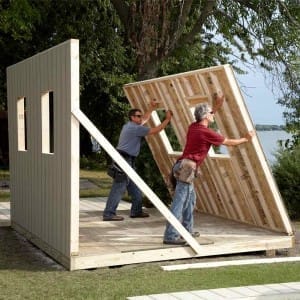
This one sounds backwards, but hear me out.
If you're using 4x8 sheet siding and you've got a couple helpers, side the walls while they're still laying flat on the floor. It's way easier to nail siding at waist height than over your head.
Just make sure the wall is straight and square BEFORE you nail the siding on. Tack the plates to the floor to hold everything in place. Then side it, and lift the whole thing up as one piece.
I've done it both ways more times than I can count. Siding first is faster every time. You just need at least one other person to help lift.
7. Keep Everything Straight With a String

A straight shed looks like a pro built it. A wavy shed looks like... well, it doesn't look good.
And all you need to keep things straight is a piece of string.
Stretch it along your rim joist at the floor. Then along the top of your walls. Then along the ridge when you set the roof.
The trick is to put a small scrap of plywood at each end so the string doesn't touch the lumber. Then use a third scrap as a gauge. When the gauge just barely fits between the string and the lumber, you're straight.
My dad taught me this. He was a framing carpenter for 35 years. He said "a string and a scrap of plywood will make you look like you know what you're doing." He was right.
8. Pick Your Best Studs for Corners and Doors
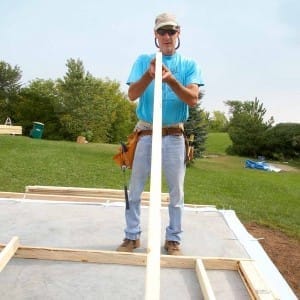
Not all studs are created equal. You know this if you've ever spent 20 minutes at the lumberyard sighting down boards.
Sight down each one. Set the straight ones aside for corners, doors, and window openings. Those are the spots where a crooked stud will cause the most problems.
The really crooked ones? Cut them up for blocking and cripples. Don't throw them out, but don't put them where they matter.
WALTER'S RECOMMENDATION:
Speaking of picking the right materials. After you build your shed, you're probably gonna want to build more stuff. Happens to everybody.
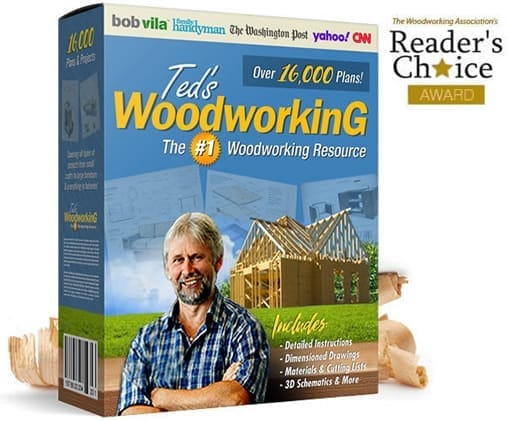
A few years ago I came across a collection of over 16,000 woodworking plans. Furniture, gazebos, workbenches, cabinets, you name it. Each one with step-by-step details, materials lists, and cut sheets.
I was skeptical at first. 16,000 sounded like a gimmick. But I've used probably 30 or 40 of them myself at this point, and they're legit. Clear, detailed, and the dimensions are actually right (which isn't always the case with free plans you find online).
It's put together by a guy named Ted. If you're the kind of person who finished your shed and immediately started wondering what's next, this is worth a look:
[Check out Ted's plans at this link]
Full disclosure, that's my referral link. If you grab it through there, I may earn a small commission. Doesn't cost you a penny extra. And I only recommend stuff I've used myself.
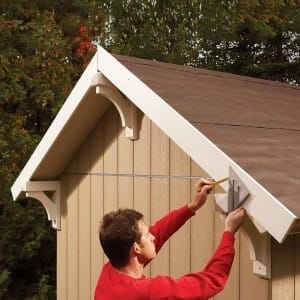
9. Dress Up a Plain Shed With Trim
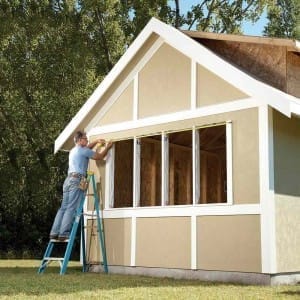
Sheet siding is fast and cheap. But it can look kinda... blah.
Adding wide corner boards, fat window and door trim, and a horizontal band at the top and bottom changes everything. Turns a $500 shed into something that looks like it cost $3,000.
I spent about $80 in trim boards on my 10x12 and two neighbors asked me who I hired. I didn't hire anybody. I just added trim.
You might also be interested
Eliminate Septic Tank Smells In Just 3 Days For Good!

99% Of Septic Tank Owners Never Heard Of This Tablet
10. Overhangs Are Worth the Extra Work
A lot of plans skip the overhang. Don't.
Even a 6-inch overhang at the eaves and gable ends keeps rain and snow off your siding. That means less painting, less rot, and a shed that looks better from day one.
Plus, overhangs give you a place to add brackets. And brackets are the easiest way to make a simple shed look custom.
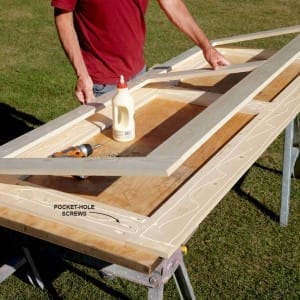
11. Build "Sandwich" Doors Instead of Buying Expensive Ones
Pre-made shed doors are expensive. And half the time they don't fit your opening anyway.
Build your own by laminating two layers of 3/4-inch boards together. Make the front layer slightly wider so you get a lip for inset panels. Use plywood or tongue-and-groove for the panels.
Glue and screw the layers together, let it dry, plane the edges smooth. Nobody will know it's two layers. And you just saved yourself $200+.
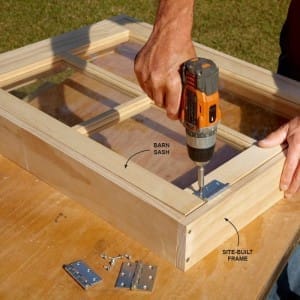
12. Barn Sash Windows Save a Ton of Money
You don't need fancy double-hung windows in a shed. Order barn sash (just the glass part) and build a simple wood frame around it.
Add a couple hinges and a hold-open latch, and you've got a window that looks good, lets in light, and cost you maybe $40 instead of $150.
I put three of these in my workshop shed. They've been through six winters and they still work fine.
WALTER'S RECOMMENDATION:
So a lot of you have been asking me about powering your shed. Workshop lights, a fan in the summer, charging batteries for your cordless tools.
I looked into solar panels a while back. Not for my whole house, just for the shed and the garage. I found this guide called Solar Innovator that walks you through building a simple solar setup without hiring an electrician.
I'm not saying I'm gonna go off-grid. But having a couple panels on the shed roof that power my lights and my radio? That was a fun weekend project. And my electric bill went down a few bucks too.
If you're curious about adding power to your shed without running a line from the house, take a look:
[Check out Solar Innovator at this link]
Same deal, that's my referral link. Small commission for me, no extra cost for you. And I've done this one myself.
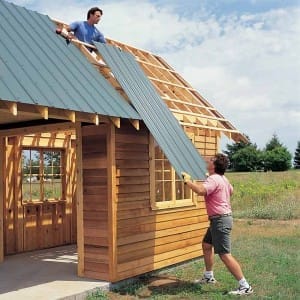
13. Order Steel Roof Panels Pre-Cut
You CAN cut steel roofing with a circular saw and a carbide blade. But you'll be picking metal shavings out of your arms for a week.
Order the panels cut to length instead. You'll get more color options too. Just remember to order a few weeks early since custom panels take time.
And measure your overhangs before you order. The panels need to stick out past the fascia just a little bit. An inch or so.
You might also be interested
Attention Veterans

You can now qualify for your concealed permit online in 30 seconds.
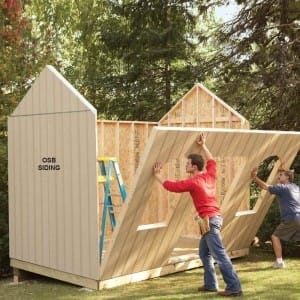
14. Use OSB Siding Instead of Plywood (If You're Painting)
If you're gonna paint your shed, there's no reason to buy expensive plywood siding. OSB panel siding like LP SmartSide costs about half as much, holds paint better, and will probably last longer.
I've used it on my last four builds. Not a single callback. Not a single issue.
Ask at your lumberyard. They'll have a few options in different thicknesses and profiles.
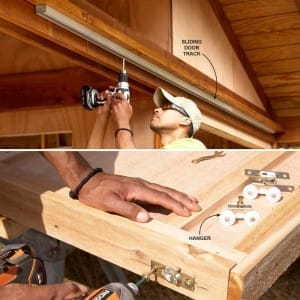
15. Skip the Farm Hardware for Sliding Doors
Heavy-duty galvanized track for a sliding shed door? Overkill.
Get heavy-duty closet door hardware instead. Johnson Hardware makes a track (model 111) and ball-bearing hangers (model 1025) that work great. They're not technically rated for outdoor use, but under an overhang they hold up fine.
And if a roller goes bad in a few years, you replace the hanger for about $8. Try that with farm hardware.
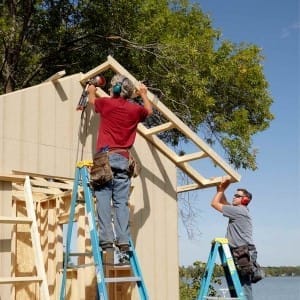
16. Rent Scaffolding for the Roof
I used to do everything from a ladder. Moving it every three minutes, climbing up and down, dropping screws...
Then I rented a 5-foot scaffold section with wheels and planks. About $110 for the week.
Changed my life. Stable platform, room for your tools, and you're not risking your neck every time you reach for something. If you're doing any roof work at all, rent the scaffolding. It's the best $110 you'll spend on the whole project.
17. Add Brackets for That Custom Look
Nothing makes a shed look more finished than brackets under the gable overhang.
You can build them from 4x4s or by laminating a couple 2-by boards together. Make a full-scale drawing first so you get the angles right. Then attach them tight to the underside of the overhang and notch the fascia to fit over them.
Takes about an hour to make a pair. And suddenly your shed looks like it came out of a magazine.
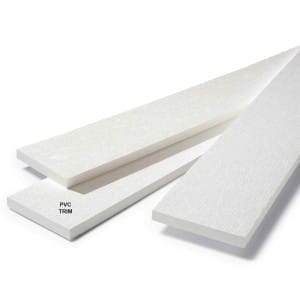
18. Don't Use Real Wood for Painted Trim
Real wood and paint don't get along. The paint peels, the wood rots, and you're repainting every two years.
Use one of these instead:
PVC trim (Azek makes a good one). You can paint it or leave it white. You can even shape it with a router. Just don't use dark paint colors.
Fiber cement (HardieTrim). Cheaper than PVC, holds paint like a champ. Just seal the cut ends so moisture doesn't get in.
Engineered wood trim (MiraTEC). Somewhere between the two. Good value.
Any of these will outlast real wood by a decade. Easy choice.
That's it. 18 tips and about 30 years of mistakes crammed into one page.
WALTER'S RECOMMENDATION:
One more thing before you go.
If you've been thinking about doing more with your property beyond the shed, there's a book I picked up last year called Self Sufficient Backyard.
It covers everything from raised bed gardens to rainwater collection to building chicken coops and root cellars.
I'm not saying you need to become a homesteader. But if you're the kind of person who likes building things and working with your hands (and if you're reading this page, you probably are), you'll get a kick out of it.
Referral link again. You know the drill by now.
RISK FREE
60 Day Access

If you don't like it after 60 days you get a 100% refund. This is my iron-clad "love it or shove it" guarantee.
You might also be interested
Wait... Your Shed Has Its Own Power?
My neighbor Dave couldn't believe I wired my shed for lights, a fan, and tool chargers without calling an electrician.
Took me one afternoon. Cost me less than $50.
You might also be interested
You might also be interested
RISK FREE
60 Day Access
If you don't like it after 60 days you get a 100% refund. This is my iron-clad "love it or shove it" guarantee.
You might also be interested

$1B Jackpot Won By Using Artificial Intelligence
You might also be interested
You might also be interested
RISK FREE
60 Day Access
If you don't like it after 60 days you get a 100% refund. This is my iron-clad "love it or shove it" guarantee.
Download 16,000 More Woodworking Plans!
Here's What You Get When You Order Now:
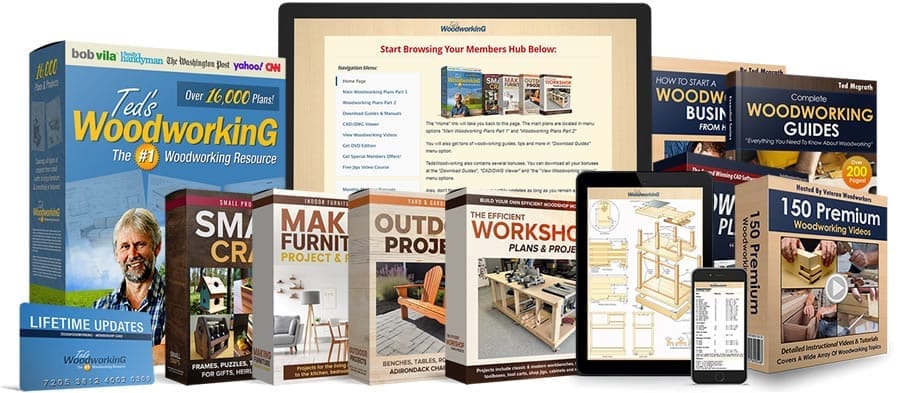

Instant access to all 16,000 woodworking plans with step-by-step details, photos, materials lists and more!
Option to have everything on 2 DVDs shipped to your mailbox
Lifetime membership access - No renewals, recurring fees or other charges
100% Risk-Free money back guarantee
Plus These Amazing Bonuses
DWG & CAD Plan Viewer
150 Premium Woodworking Videos
How To Start A Woodworking Business
Complete Woodworking Guides
One time payment. No hidden charges.(I reserve the right to end this introductory price at anytime without warning)
www.waltershedplans.com
This site is not a part of the Facebook website or Facebook Inc.
Additionally, this site is NOT endorsed by Facebook in any way.
FACEBOOK is a trademark of FACEBOOK, Inc.
This site is not a part of Meta Platforms, Inc. or any of its products or services. Additionally, this site is NOT endorsed by Meta in any way. FACEBOOK and INSTAGRAM are trademarks of Meta Platforms, Inc.
This site is not a part of the Google website or Google LLC. Additionally, this site is NOT endorsed by Google in any way. 'Google' is a trademark of Google LLC.
© 2025–2026 ProfitAds, LLC d/b/a WalterShedPlans. All Rights Reserved.
PLEASE READ THIS DISCLAIMER:
These plans are published here for educational purposes. Some of the older plans here will often need modifications for modern materials, and may need modifications to update them to modern safety standards. They provide conceptual information. Periodic changes in the National Design Specifications for Wood Construction, changes in building materials, snow load variations and the serious impact of deviations from the plan make it imperative that professional services be utilized to tailor these plans to your situation. The creator of this makes no warranty for these plans. You are solely responsible for how you use them. To summarize, we don't encourage anyone to build some of the major projects shown here "as-is" unless you are experienced enough in construction to make allowances to modernize some of the older plans. If you are interested in creating projects from these plans and don't have the requisite knowledge to bring them to modern safety standards, we insist you consult a professional.
Material quantities listed are indicative and intended for preliminary budgeting only. They should not be considered final totals. Minor variations or omissions may exist. Always verify with your local supplier or a trusted building professional before ordering materials.
Do not purchase materials or attempt to build this shed project unless you have studied the information provided thoroughly, and have verified all dimensions and material requirements for yourself. Also verify that the plans conform to local building codes and practices. Although every effort has been made to ensure the accuracy of the information and design, the user is ultimately responsible for the use of this information. You, the plan buyer and builder, assume all risks and responsibilities associated with building this shed/barn.